How To Find an Arrow After the Shot


There is nothing good about losing an arrow. However, it’s bound to happen from time to time if you shoot or hunt a lot. The two things that frustrate me the most about losing an arrow is that they are expensive, and I miss out on the opportunity to inspect the arrow to confirm when to start blood-tracking. After years of hunting and shooting with a bow and arrow, I have adopted a few simple things that help me recover most of my arrows.

Arrows are easier to find if they have lighted nocks and florescent colored fletching’s. However, more drastic measures might need to be taken, such as using a metal detector or blood-tracking dog. Losing arrows is preventable if the hunter or archer follows a few simple tips and tricks.

Keep in mind that some things are out of our control when it comes to losing arrows. For example, an arrow can remain stuck in a deer that wasn’t fatally shot. Even though some things are out of our control, there is a lot we can do to prevent losing an arrow.

By following the tips in this article, you will recover most of your arrows which will save you time and money in the long run. These tips will also increase your odds of finding game and cut down on the frustrations that come with losing an arrow.

Tips for finding a HUNTING arrow

(For tips on how to find a PRACTICE arrow, scroll further down the page)

1. Use a lighted nock

Many hunters don’t spend the extra money on lighted nocks even though they usually end up paying for themselves over time. It’s a no brainer decision for me to shoot arrows with lighted nocks. I hunted long enough with and without lighted nocks to learn that they significantly increased my odds of finding arrows.

When you add up the cost of lost arrows, lighted nocks pay for themselves. Even if you only find a few more arrows than you would have without them, you’ll still be money ahead.

Lighted nocks have several advantages beyond the obvious. They make it easier to see where the arrow hit the animal, especially if the hunt is being filmed. Also, a lighted nock can increase the odds of recovering a shot animal if the arrow stays stuck inside them. It’s possible that a lighted nock can lead you directly to the animal you shot if tracking in the dark.

One downside of using lighted nocks is that they aren’t all built that well, so it’s important to buy the right ones. I have field-tested several different nocks, and these are the best and most reliable lighted nocks that I have found.

2. Use fletching’s with bright florescent colors

Arrows are easier to find when they have bright florescent colored fletching’s. This is especially true at nighttime when blood tracking with a UV flashlight.

3. Use a UV flashlight

When arrows have florescent colored fletching’s, they will light up like a Christmas tree in the dark if you shine a UV flashlight on them. I bought this UV flashlight on Amazon, and it works great. I even use it for blood-tracking.

4. Remember the specific spot where you shot

Find a point of reference or something that helps you remember where the animal was standing when you took the shot. This isn’t as easy as it sounds because our attention is usually focused on the game we are shooting at and not the spot they were standing.

5. Keep your eye on the arrow

It’s easy to forget about focusing on the arrow when the eyes want to be looking at the animal we are shooting at. It’s natural for us to see the animal’s reaction to the shot, but we also want to try to focus on the flight of the arrow. Arrows can deflect off branches, hit trees, skip of the ground, stay stuck in the deer, and so on.

6. Film the hunt

Filming hunts has a long list of benefits, but it’s not for everyone. One of the pros of filming a hunt is that it really helps with finding arrows. You can replay the video and confirm exactly where the animal was standing when you took the shot, where it hit the animal, and possibly see where the arrow went or if it stayed stuck in the animal.

7. Hunt from an elevated position

Hunting from elevated positions will prevent arrows from getting buried underneath debris. In a perfect scenario, our arrows will pass through game and stick in the ground with the fletching’s staying exposed above the ground.

8. Shoot an arrow that’s built for maximum penetration

Arrows have a better chance of being found if they pass all the way through the animal. One way to improve the odds of that happening is by shooting arrows that are built for maximum penetration. Read my article to see how to choose an arrow for a compound bow.

The main things that determine arrow penetration are broadhead selection, arrow weight, and FOC.

9. Don’t take far shots

Far shots have higher odds of missing the target. They also increase the likelihood of our arrows running away from us if they get stuck in the animal. Lastly, far shots make it harder to keep an eye on the arrow and see where the arrow ended up.

10. Shoot animals at a good angle

Arrows have a better chance of passing through and not getting stuck in an animal if we take good shot angles. We want to avoid shooting areas of the body that have large dense bones that make it difficult for arrows to penetrate.

Click this link to learn where to aim when shooting deer with a bow

11. Find someone else to help you look

It never hurts to have an extra set of eyes when looking for a lost arrow. Recruit a buddy to help you find it.

12. Use a blood tracking dog

Blood tracking dogs can help you find an arrow that has blood on it.

Tips for finding a PRACTICE ARROW

The tips for finding a practice arrow are a little different from finding a hunting arrow even though there are some similarities. 

1. Shoot at big targets

Many arrows get lost just by not hitting the target. So, shoot a bigger target.

Even though shooting at big targets will help you prevent losing arrows, I actually prefer shooting at a small target with a big backstop behind it.

Shooting at a small target will make you a more accurate shooter and it’s great practice for hunting situations. This is the small target I recommend buying on Amazon.

2. Have a backstop behind the target

Most people that lose arrows during target practice aren’t shooting with a backstop behind the target. With no backstop, it’s very easy for an arrow to get lost underneath grass or debris when it misses the target. This is especially true if shooting on flat ground.

A backstop doesn’t have to be a big wall of targets like you see at archery shops. It can just be a steep hill behind the target. The idea is to have the arrow sticking up out of the ground if it doesn’t hit the target, that way it’s easy to see.

3. Use a lighted nock

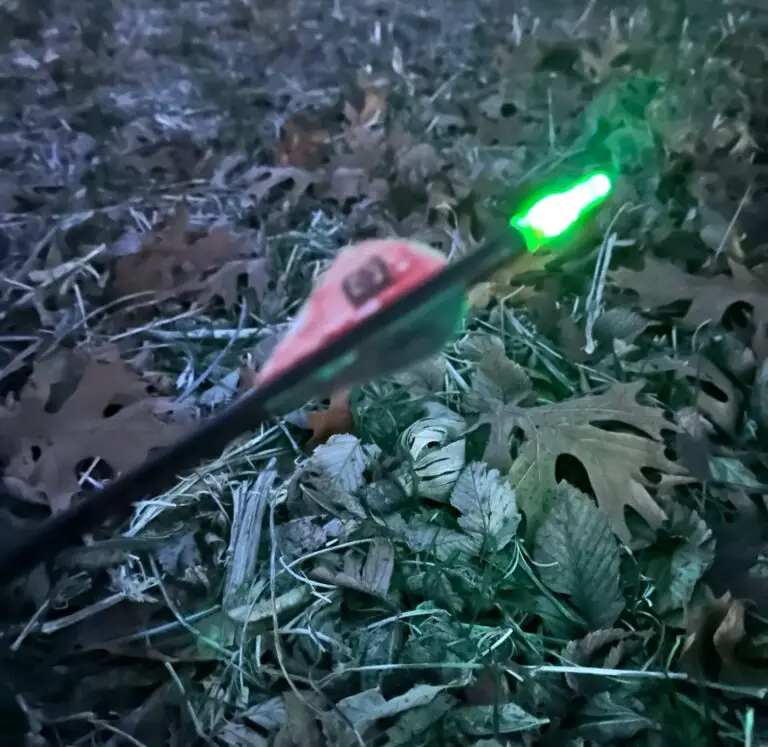
Lighted nocks have a lot of pros and not many cons. They obviously make it easier to see the shot and recover lost arrows. The key is buying the right nocks because many of them aren’t designed very well and often fail. These are the lighted nocks I recommend buying on Amazon.

4. Use fletching’s with bright florescent colors

Bright florescent colored fletching’s are easier to see and find. Have your arrows built with bright fletching’s to help you find them easier, especially in the dark.

5. Use a UV flashlight

If an arrow with bright florescent colored fletching’s cannot be found, wait until it’s dark outside and use a UV flashlight to find it. The florescent colors will glow bright at night and make it easier to find.

6. Find your shooting line

If an arrow misses the target, set the bow down where you were standing when you took the shot. This will help you find the line of shot and narrow down the search area.

7. Look for ground disturbance

Arrows can leave a streak in the grass or push leaves away. Look for disturbances on the ground which can be a clue to where the arrow is.

8. Use a rake

When arrows are hidden under grass or debris, try using a rake to claw the arrow up. I recommend raking at a 45-degree angle to how you think the arrow is pointing. Start raking closer to target and work your way away from the target. This will increase the odds of catching the arrow in the rake and exposing it since the fletching’s will likely sit a little higher from the ground than the tip.

9. Use an arrow finder or another arrow

Arrow finders can be convent tool to have in your toolbox but I don’t recommend buying one. In the rare occasion when an arrow needs to be found, using a rake or another arrow will work just fine as a substitute.

10. Use a metal detector

Metal detectors are probably the best method of finding lost practice arrows. However, most people don’t own a metal detector and probably shouldn’t purchase one just to find lost arrows. I recommend spending that money on other things that I mentioned in this article to help you prevent losing an arrow in the first place.

11. Mow the grass

Mowing the grass will make it easier to see arrows that are hiding underneath.

12. Don’t shoot far distances

The best way to not lose an arrow is to focus on the things you can do to prevent it from happening. One of those things is by not shooting far distances that are outside your effective range.

13. Shoot at an elevation

If you don’t have a backstop or hill behind the target. Try shooting at a high elevation. If an arrow misses a target, shooting at an elevation will increase the odds of them sticking in the ground with the fletching’s exposed above the ground. Try shooting from a tree stand or an elevated deck on your house (if you have one).

Recent Posts