
Let’s start off by getting the obvious out of the way. Rich people can afford to haul in quality soils by the truckload and get it laid everywhere they want their food plots to be. The rich can also afford to buy a no-till drill and tractor to plant their seed in the ground. We aren’t going to talk about a no-till food plot strategy with high end equipment. This article is for the hunter that doesn’t have expensive planting equipment but is still looking to achieve great results and improve hunting opportunities.
Now, I have to mention a quick disclaimer at this point in the article. This no-till strategy isn’t going to work for every property and the probability of failure over other planting methods through the use of planting equipment is most likely higher. Depending on your specific planting conditions this no-till food plot strategy may not work well for you. For example, if your soils consist of heavy clay then you may have a difficult time getting good seed to soil contact that’s needed for growing a successful food plot. To learn more about how to avoid food plot failures, make sure you click the link and read that article.
The basic rules of this no-till food plot strategy are simple. You’re not going to disturb the soil in any way. You’re not going to disc it, rake it, or anything similar to this. This is rule #1. Don’t break the soil!
Rule #2 is getting your seed on the ground. What I prefer to use is a seed spreader to spread the seed and walk the food plot area east/west and north/south, crisscrossing so I know my seed is evenly dispersed across the area. Adjust the opening on the seeder so that it barely releases any seed out of it when you crank the wheel. If you haven’t done this before you will be shocked how quickly you can run out of seed before coving your entire plot. Its better to walk your plot several times over to get a feel for it before running out of seed. Once you walked over your plot the first time, you may need to adjust the opening of the seed spreader again to allow a little more seed to get released and then walk over the plot again for a second time. (Note: I mentioned a no-till drill a few paragraphs back and if you can afford to rent one or have access to this equipment through some other way, then these drills are very convenient and provide excellent germination. However, you need a bigger area to plant on in order to make it worth the trouble of using this equipment to plant your seed.)
Ok, so these are the two basic rules of my no-till food plot strategy but we still need to dig a little deeper. Once the seed is broadcasted on the ground we have to wait on Mother Nature to do her thing. Let’s move on to how we can increase the success of this no-till planting strategy.
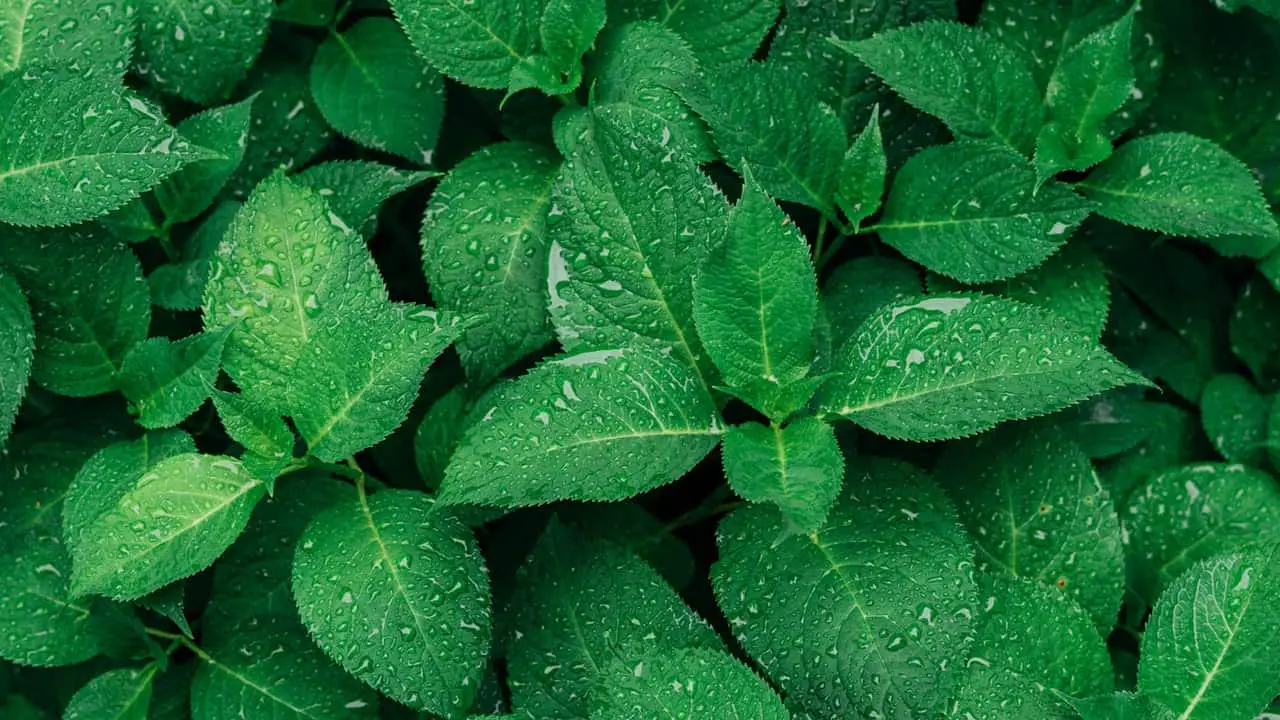
It’s important that your seed makes good contact with the ground so I will do what I can to increase those odds. First off, I’ve prepared the food plot area weeks prior to planting. Before starting this no-till planting strategy you need to have exposed soil that’s free of living vegetation. When you spray the weeds and kill all of the living vegetation in your food plot you will have a bunch of dead debris from what was growing there originally. This dead vegetation will allow sunlight to reach the soil, help you with moisture retention, and also end up turning into organic matter which will help build your soil health.
Once the seed is broadcasted on the ground i’ll take my ATV cultipacker, which is like a roller that I roll behind my ATV and I’ll just roll over the food plot. This process helps ensure that seed reaches the soil helps pack it down. If any seed gets hung up in the dead vegetation the cultipacker will help shake that seed from the dead debris and help it reach the soil.
If you don’t have a cultipacker, don’t sweat it. Just get a rope with a wooden log attached to it and drag it behind you while you walk over the plot or pull it with your ATV. I also hear of people using a section of chain-link fence to do this. Don’t make the mistake of using one of those harrow drags with the teeth on it. All you are going to do is clump up debris in the drag and create bare spots of dirt. You don’t want that. You want dead debris evenly dispersed across the food plot.
Ok, so now you got the seed shaken down to the soil, you can feel good knowing that a decent rain event will provide the seed-to-soil contact needed to grow a successful plot. Now here’s the thing, a lot of people think that when it comes to seed selection and no-till food plots, you can’t choose large seed types to grow. Some say you have to pretty much stick to only planting clover and brassica seeds because they’re real tiny. That’s not true at all. Again, the key is you need a solid rain with ideal soil conditions for this planting method.
You can plant soybeans successfully if you follow the tips in this article, but it will be more challenging with higher odds of failure than if you chose to plant smaller seed species. Soybeans can do very well if you follow the advice in this article, so don’t be afraid to try.
Quick recap. We have discussed how to plant the seed, timing your planting with a few days of heavy rain in the forecast, and the seed-to-soil contact that’s needed for germination. That rain event can make or break the success of implementing this no-till planting strategy so I want to make sure i’m stressing that enough in this article. Anyways, let’s talk about year-round rotation and getting the process started from the beginning.
It’s pretty simple, you always want something growing and you never want a field of bare dirt. If you have been through the Midwest after the crops have been harvested you know all those fields are just bare dirt. Only a small percentage of farmers are planting cover crops after harvesting their corn and soybeans. For no-till food plotting you need to have that cover crop. It’s going to help increase the success of your next seed planting and nurse that crop through germination.
Let’s talk about the springtime of year when things are starting to grow. If you have winter rye already in place or this is your first time working a field full of weeds then your first step is going to be killing what is growing. By killing, what I mean is spray everything with “Roundup”. I put “Roundup” in quotations because this is a loose term that people commonly use as a word for a weed killer product. The important ingredient inside weed killer products is called glyphosate.
The same amount of glyphosate in Roundup can also be found in other competitors products at much better prices. These off-brand products work exactly the same as Roundup and you can save a lot of money by purchasing these off-brand weed killers. This is the weed killer I buy on Amazon. Your Big R stores, Rural Kings, and similar farm stores will carry these cheaper weed killers also. You can buy them in bulk there and you’re going to save a lot of money by not buying Roundup at stores like Home Depot or Lowe’s.
So, you’re going to kill all your weeds in the spring and give it a week or two, in order to die off. You will probably have to repeat this process two or three times depending on how bad the weeds are in your field. Try to spray the weeds when they are less than a foot tall because you will kill 90% of the weeds with one spraying.
When spraying glyphosate use two ounces per gallon. I use this backpack sprayer most frequently, but from time to time I use my ATV sprayer especially when my access trails and roads need killed down also. Once all of the weeds have been sprayed and a few weeks pass by, I will then go back and spray again to kill off any remaining weeds and broadcast buckwheat on the ground using the process I’ve already discussed earlier in the article.
 Why plant buckwheat? Buckwheat is an amazing crop. Let me explain. I bought and sold a farm in Kankakee County Illinois, and if you did a little research on that area you might learn that it’s been referred to as the Kankakee Sands. Most people in Illinois don’t even know about the Kankakee Sands. The Kankakee Sands area literally has SANDY SOIL EVERYWHERE. Cactus plants even grow there because the soil is so dry and sandy.
Dry and sandy soil doesn’t fit the typical stereotype of most Illinois soils. However, my soil conditions required me to strictly use buckwheat and rye because they can grow in almost any soil conditions and will build up your soil quality. It’s going to take time to build up the soil when you’re working with those kinds of conditions but it’s going to work in the long run. You just have to practice patience.
When you’re planting in sandy soil you really need to do whatever you can to keep moisture in the ground somehow. If you disc ground that is sandy you are really going to make it difficult for your soil to retain moisture. Mother Nature will have a much easier time at making your food plot unsuccessful.
Anyways, when springtime comes around you’re going to kill your weeds and plant your buckwheat. The buckwheat is going grow successfully with very little help, even without lime and fertilizer, but I encourage you to apply both on your plot. Ideally you have taken a soil test already and know the results of the test. If not, then just get it done.
There is no ideal time to do a soil sample test so do it whenever. You can get a test done for cheap and it will ensure that your planting will have the PH and nutrients it needs to grow well. If you don’t do a soil test and your plot fails then most of the time its because you didn’t take the test and apply the right amount of lime and fertilizer. Here is a link to the soil kit I buy on Amazon.
I typically have the results of a soil test from the previous year so I already know how much lime and fertilizer I need. During the Spring I will apply my lime and fertilizer at the same time that I plant my seed or spray my plots to cut down on the number of trips that I need to take to my property. If you have a lot of lime to spread it can be a pain to spread it with a hand seeder, even though it can still be done. I have a seeder that mounts to my 4-wheeler that holds a lot more lime so I can get the job done with way less effort and time. If you are planting large plots over an acre or more, an ATV seed spreader is highly recommended.
Once i’ve applied my lime and fertilizer I will finish up by broadcasting the buckwheat. I’m going to let the buckwheat grow to maturity before I come back to do anything else. Once it is mature and my fall planting is ready to plant, I’m going to broadcast my fall seed blend into the standing buckwheat. Once the seed is broadcasted I will roll over the buckwheat with a cultipacker and lay it on the ground to cover my seed. Buckwheat has a hollow stem when it’s mature and it’s very easy to break and get it to fall over. You can simply drive over it with your vehicle and have the same affect if you don’t have a cultipacker or roller. If you are considering to buy a cultipacker then check out this article.
Once the buckwheat is laying down on the ground with the fall blend seed resting on the soil beneath it, I’m going to spray glyphosate over the entire food plot area to ensure all the buckwheat and other weeds die while my fall food plot starts to germinate. Once everything dies, the dead buckwheat will be laying there like a blanket over your fall seed blend and act as a greenhouse for your new crop. The dead buckwheat will allow just enough sun to reach the soil for germination and provide the shade that the soil needs to hold moisture in the ground.
The decaying buckwheat and weeds will slowly break down into the soil and turn into organic matter in the soil. This process getting repeated over and over is what builds up your soil quality and makes it dense. A good soil density, along with not disking it, is what helps keep moisture in the soil. The moisture retention of dense soil is really good. When you encounter growing seasons with minimal rain and drought conditions, dense soils have a better chance at competing with Mother Nature and still produce a great crop.
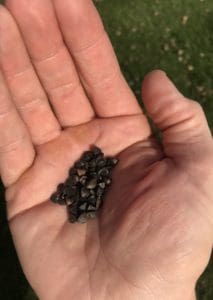
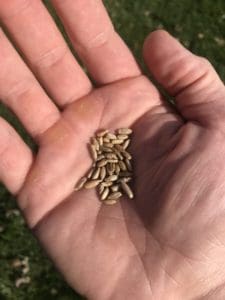
Once my fall food plot is about half way through its growing cycle, I’m going to plant cereal rye (aka. Winter rye) over the whole plot and make sure I fill in any holes where my fall seeds didn’t germinate. Take a look at the picture of cereal rye in my hand so that you can tell the difference between cereal rye and rye grass, which you absolutely do not want to plant. Do not plant rye grass. That’s the stuff you get in Home Depot and people put on their yards. You don’t want that. You want seed that looks like this picture.
 Why plant cereal rye? I like cereal rye for three reasons. First, just like buckwheat, this seed can grow anywhere. Second, it’s the first thing to green up in the spring offering deer a much needed food source when nothing else is growing. And third, the early spring food source attract’s deer and has been known as a great place to find shed antlers.
Alright so you’re going to plant the cereal rye on your entire food plot area including the empty holes where nothing grew from your fall blend. Those rye seeds don’t need much to grow and will have no problem growing up through your existing fall blend. At this point you are done planting for the year. Enjoy your hunting season!
Ok, now let’s fast forward to the end of hunting season. It’s time to talk about the next step in the no-till planting rotation strategy. When spring time comes around everything starts to grow again, that cereal rye that you planted should be growing strong since it’s the first thing to turn green in the spring. You need to make sure that your rye planting doesn’t mature into a hard seed head. You need to spray and kill off your cereal rye when the seed head is still soft. The last thing you want to happen is for all of those little seeds to dry out and drop on the ground.
We are now at the point when we are going to repeat this no-till planting process and broadcast buckwheat in the standing cereal rye. After you broadcasted the seed you can then rolling it over and spray it, or just spray it if you don’t have a roller. Once the cereal rye dies off it will lay down on its own.
Ok, at this point we have completed the entire planting cycle of this no-till food plot strategy. The only thing that you need to change from year one to year two is possibly your fall seed blend. Make sure you don’t plant certain species like turnips in the same spot every year. Practice a good rotation strategy to make sure you don’t impact the health of your food plot.
There are a lot of different food plot strategies that go hand-in-hand with a hunting strategy. As I stated earlier in this article, make sure you read how to avoid food plot failures. This will help you with your food plot and hunting strategy.